

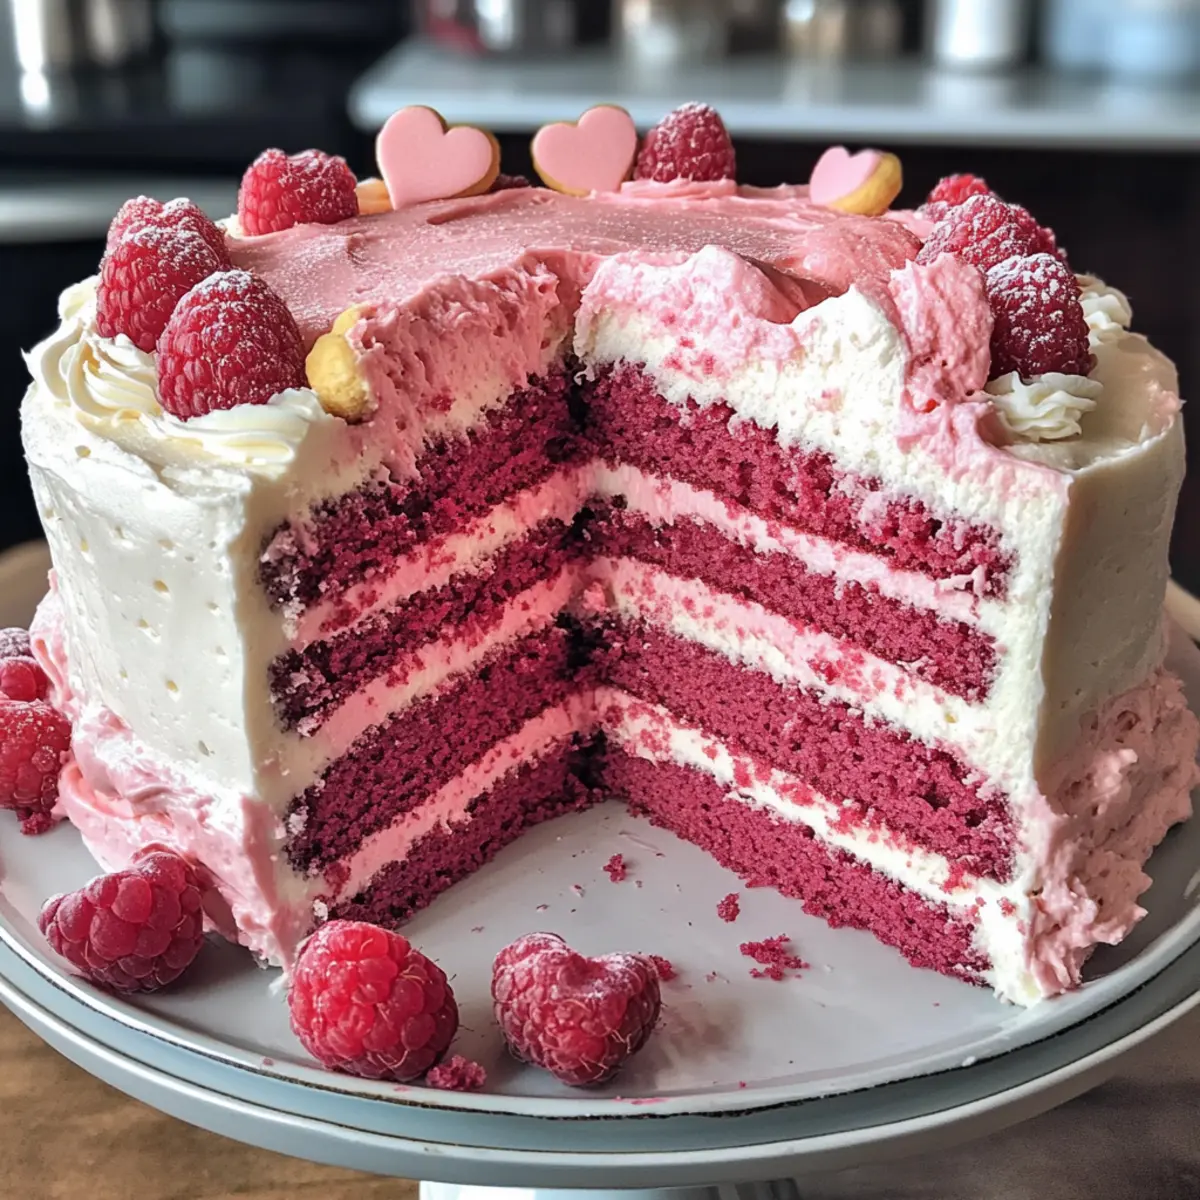
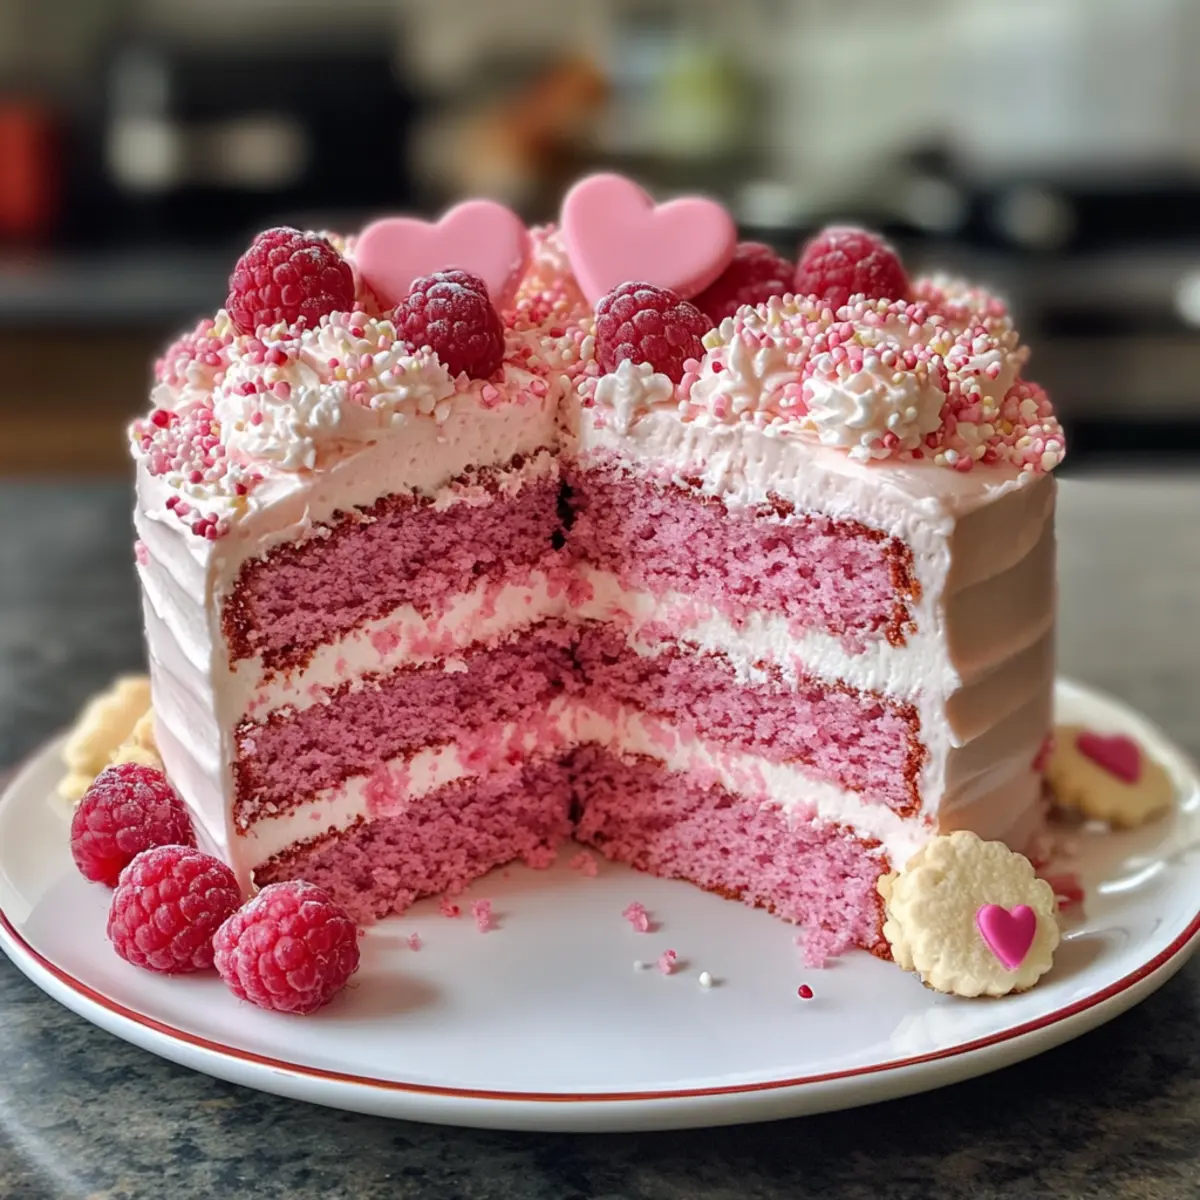
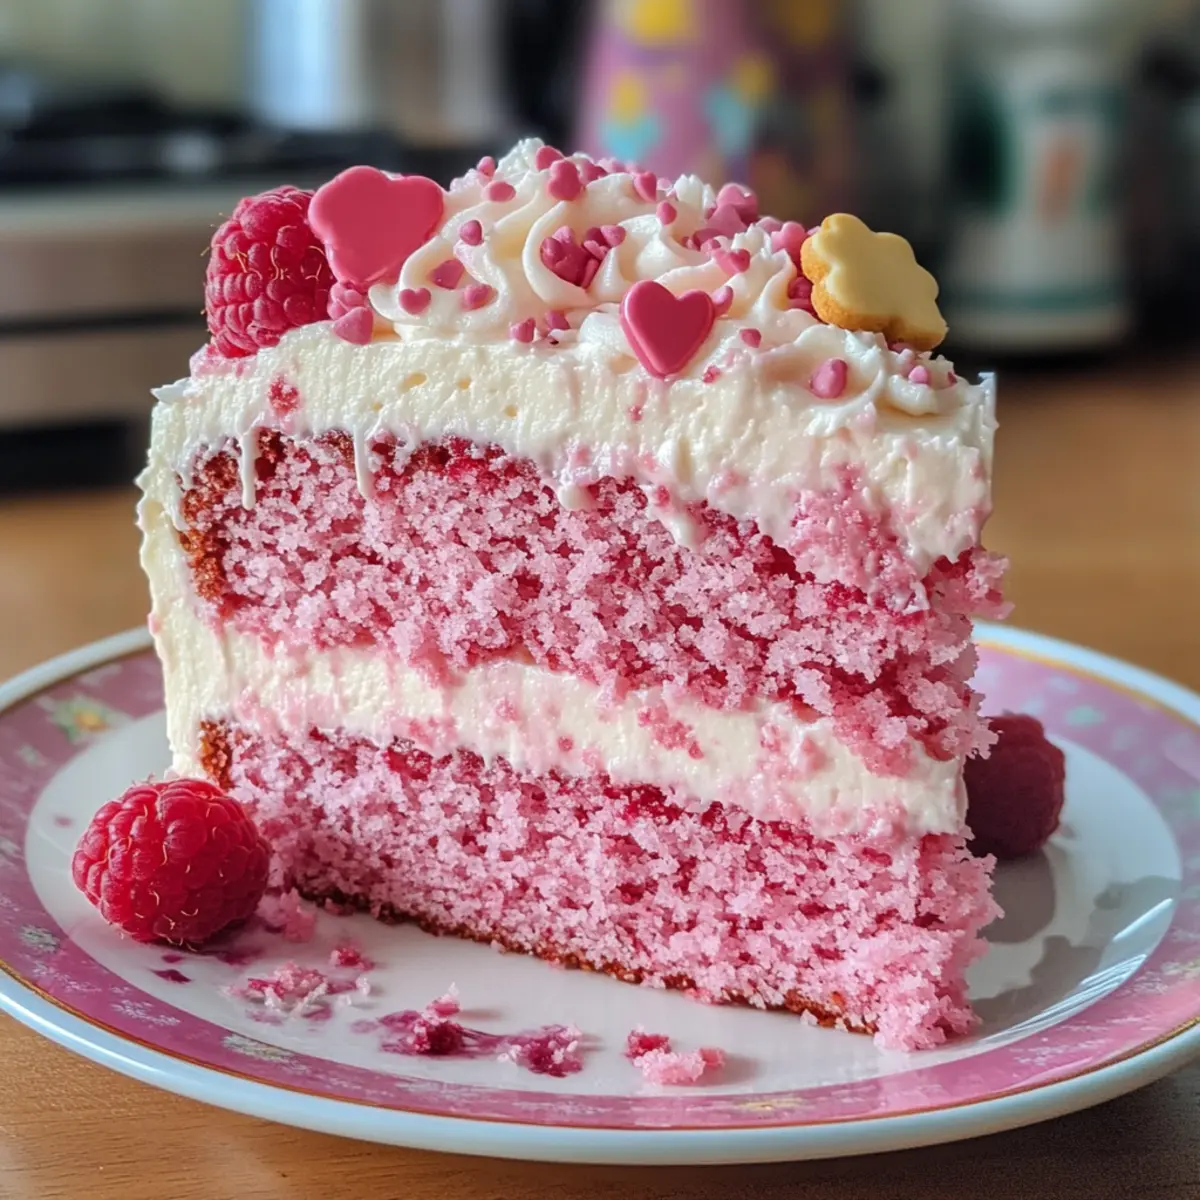
The moment the oven timer buzzes, I feel a rush of excitement as I pull out my Pink Velvet Cake, the soft blush of the batter promising something magical within. This enchanting creation is perfect for turning any gathering into a celebration, boasting a tender crumb that practically melts in your mouth. Not only is it a feast for the eyes with its delicate hue and gorgeous cream cheese frosting, but it also stands out as a comforting treat that effortlessly brings people together. As you slice into this moist, luscious cake, its subtle vanilla and hint of cocoa will captivate even the most discerning dessert lovers. So, who’s ready to dive into a slice of happiness?
Why Choose Pink Velvet Cake?
Irresistible Appeal: The blush hue of this cake is simply stunning, making it the perfect centerpiece for any occasion.
Melts in Your Mouth: With its delightful soft texture and creamy frosting, every bite is a luxurious experience.
Celebratory Anytime: Ideal for birthdays, anniversaries, or casual gatherings – it transforms every moment into a celebration.
Quick to Prepare: The process is hassle-free, ensuring you spend less time in the kitchen and more time enjoying with loved ones.
Versatile Variations: Feel free to experiment with flavors like chocolate or citrus zest for a unique twist on the classic. Add a touch of elegance with a refreshing pairing of your favorite drinks or perhaps serve it with a warm cup of coffee, just like in our Homemade Pancakes Elevates article!
Pink Velvet Cake Ingredients
For the Cake Batter
• All-Purpose Flour – Essential for the cake’s body; avoid over-measuring to prevent dryness.
• Cornflour – Helps create a fine crumb; can substitute with more all-purpose flour if unavailable.
• Baking Powder – Ensures the cake rises; make sure it’s fresh for optimal effectiveness.
• Baking Soda – Balances acidity from vinegar; omit if using self-raising flour.
• Unsweetened Cocoa Powder – Adds depth of flavor without overwhelming sweetness; feel free to reduce for a paler cake.
• Salt – This flavor enhancer balances sweetness for a well-rounded taste.
• Soft Butter – Provides moisture and rich flavor; ensure it’s at room temperature for easier creaming.
• Fine Sugar – Contributes sweetness and tenderness; can substitute with granulated sugar but note that texture may vary.
• Large Eggs – Adds structure and moisture; using eggs at room temperature helps with incorporation.
• Milk – Creates a moist, tender cake; consider buttermilk for an added layer of flavor and tang.
• White Vinegar – Tenderizes the cake and assists with leavening; lemon juice can substitute if needed.
• Vanilla Essence – Infuses a fragrant sweetness; extract can offer a stronger flavor.
• Vegetable Oil – Keeps the cake tender; substitute with other neutral oils as desired.
• Pink Food Color – Achieves the signature blush of Pink Velvet Cake; beet juice or pomegranate can be used for natural alternatives.
For the Cream Cheese Frosting
• Cream Cheese – Provides tanginess and a creamy consistency; mascarpone can serve as an alternative.
• Icing Sugar – Ensures the frosting has the perfect thickness; powdered sugar results in a smooth finish.
For Decoration
• Fresh Raspberries – Adds brightness and a touch of flavor; feel free to substitute with strawberries or your favorite fruits.
• Heart-Shaped Biscuits/Sugar Pearls – Enhance visual appeal; these are optional but add a delightful finishing touch.
When making this Pink Velvet Cake, be sure to gather these ingredients for a moist and decadent experience that will leave your guests reaching for seconds!
Step‑by‑Step Instructions for Pink Velvet Cake
Step 1: Prepare Tangy Milk
In a small bowl, combine 1 cup of milk with 1 tablespoon of white vinegar, stirring gently. Let the mixture sit for about 5 minutes until it thickens slightly, creating a tangy buttermilk substitute that will add moisture and richness to your Pink Velvet Cake.
Step 2: Sift Dry Ingredients
In a large mixing bowl, sift together the all-purpose flour, cornflour, cocoa powder, baking powder, baking soda, and salt. This step is crucial for incorporating air into the dry ingredients, ensuring a light and tender cake crumb, so set this mix aside while you move to the next step.
Step 3: Cream Butter and Sugar
Using a stand mixer or hand mixer, beat 1 cup of softened butter and 2 cups of fine sugar together until the mixture becomes pale and fluffy, about 3 to 5 minutes. This process incorporates air, resulting in a tender Pink Velvet Cake, so be generous with your mixing!
Step 4: Add Eggs
With the mixer on low speed, add the large eggs to the butter mixture one at a time, allowing each egg to fully incorporate before adding the next. Then mix in 1 teaspoon of vanilla essence and ½ cup of vegetable oil until everything is combined smoothly, adding richness and moistness to the batter.
Step 5: Combine Wet and Dry Ingredients
Gradually add the prepared tangy milk to the creamed mixture while gently folding in the sifted dry ingredients. Be careful not to overmix; stop as soon as the batter is smooth, ensuring that your Pink Velvet Cake will turn out fluffy and delightful.
Step 6: Bake the Cake
Divide the batter evenly between prepared, greased cake pans. Place them in a preheated oven at 180°C (350°F) and bake for 30 to 35 minutes or until a toothpick inserted into the center comes out clean with a few moist crumbs. The cakes should rise beautifully, creating a perfect base for your frosting.
Step 7: Make Frosting
In a medium bowl, beat together 8 oz of cream cheese, ½ cup of softened butter, 4 cups of icing sugar, and 1 teaspoon of vanilla essence until creamy and smooth. The frosting should be light and airy, ready to spread beautifully on your Pink Velvet Cake once the cakes have cooled completely.
Step 8: Assemble the Cake
Once the cake layers have cooled, place one layer on your serving platter. Spread an even layer of cream cheese frosting on top, then gently place the second layer over it. Frost the top and sides of the cake with remaining frosting, creating an elegant finish for your delightful Pink Velvet Cake.
Step 9: Chill and Decorate
Refrigerate the assembled cake for about 20 minutes to set the frosting, making it easier to slice later. Once chilled, decorate the top with fresh raspberries, heart-shaped biscuits, or sugar pearls for an eye-catching presentation that complements the charming blush of your Pink Velvet Cake.
Expert Tips for Pink Velvet Cake
- Room Temperature Ingredients: Ensure all ingredients, especially eggs and butter, are at room temperature to achieve easy blending and a smooth batter.
- Sift Carefully: Take time to sift your dry ingredients thoroughly; this prevents clumps and ensures a light, airy cake that melts in your mouth.
- Avoid Overbaking: Keep an eye on your cake as it bakes; overbaking can lead to a dry Pink Velvet Cake. Check a few minutes prior to the end time.
- Frosting Consistency: Aim for a light and creamy consistency with your cream cheese frosting; too much sugar can make it overly thick, so add gradually.
- Natural Color Alternatives: Consider using beet juice or other natural coloring agents instead of food dye for a healthier, vibrant blush without compromising flavor.
What to Serve with Pink Velvet Cake?
The perfect Pink Velvet Cake deserves a delightful complement, turning a simple dessert into a cherished memorable moment.
-
Creamy Vanilla Ice Cream: The rich vanilla flavor of ice cream beautifully contrasts the light texture of the cake, enhancing each bite. A scoop beside your slice creates a luscious experience that’s hard to resist.
-
Fresh Berries: Juicy strawberries or blueberries add a fresh, tart note that balances the sweetness of the cake. Not only do they look stunning on your plate, but they also bring a burst of vibrant flavor.
-
Zesty Lemonade: A glass of refreshing lemonade provides a zesty punch that cuts through the richness of the frosting. This lively drink will awaken your palate, making your dessert time truly special.
-
Chocolate Drizzle: A touch of melted dark chocolate drizzled over the cake adds an indulgent layer of richness. This pairing is perfect for chocolate lovers and enhances the cake’s cocoa notes beautifully.
-
Mint Tea: Sipping on a warm cup of mint tea alongside your Pink Velvet Cake creates a soothing experience. The gentle herbal notes are the ideal foil for the cake’s sweetness, leaving you feeling refreshed.
-
Chocolate-Covered Strawberries: These treats are a decadent pairing, combining sweet and fruity flavors for a delightful sensory experience. The richness of chocolate complements the tender cake in a luxurious way.
-
Whipped Cream: A dollop of light whipped cream enhances the cake’s moisture, adding a lovely creamy texture. It’s the perfect finishing touch to an already delightful dessert, making each slice irresistible.
Make Ahead Options
Preparing your Pink Velvet Cake ahead of time is a fantastic way to save effort and stress, especially for parties and celebrations! You can bake the cake layers up to 2 days in advance. Once cooled, wrap them tightly in plastic wrap and store in the refrigerator to maintain moisture and flavor. The cream cheese frosting can also be made up to 3 days ahead and stored in an airtight container in the fridge. To finish, frost the cake the day you plan to serve it for the freshest taste. Simply allow the frosting to come to room temperature before spreading it on your cake, ensuring that your Pink Velvet Cake remains just as delicious and beautiful!
How to Store and Freeze Pink Velvet Cake
Room Temperature: Keep the Pink Velvet Cake in an airtight container for up to 2 days at room temperature. This will maintain its soft texture and freshness.
Fridge: For longer storage, place the cake in an airtight container and refrigerate it for up to 5 days. Ensure it’s well-covered to prevent it from absorbing any odors.
Freezer: If you want to preserve the cake for future celebrations, wrap it tightly in plastic wrap and store in the freezer for up to 3 months. Thaw in the fridge overnight before serving for the best texture.
Reheating: If you enjoy your cake warm, gently warm individual slices in the microwave for 10-15 seconds. Just enough to revive that delightful moistness without overheating!
Pink Velvet Cake Variations & Substitutions
Feel free to explore different takes on your Pink Velvet Cake to suit your style and taste!
- Natural Coloring: Swap in beet juice for a vibrant hue without relying on artificial dyes. It adds a subtly sweet flavor, too!
- Frosting Flavor Twist: Enhance the cream cheese frosting by adding chocolate, citrus zest, or even a splash of almond extract for a delightful change.
- Mini Cakes: Turn your batter into adorable mini cakes or cupcakes, perfect for individual servings at celebrations or simply for fun.
- Dairy-Free Option: Use almond milk and a dairy-free cream cheese alternative for a luscious, rich frosting while keeping it vegan-friendly.
- Flavor Boosters: Add a tablespoon of espresso or coffee powder to the batter for a deeper chocolate flavor that beautifully complements the pink tones.
- Different Oils: Experiment with coconut oil or avocado oil for a unique taste while maintaining the cake’s moisture.
- Fruit Garnish: Instead of raspberries, top your cake with colorful edible flowers or slices of fresh strawberries for added visual appeal and a fruity touch.
By incorporating these variations into your baking, you’re sure to spark creativity in the kitchen! And if you’re looking for more sweet inspirations, don’t forget to check out our delightful Oreo Cheesecake Indulge and Rhubarb Streusel Cheesecake recipes. Whatever you choose, your Pink Velvet Cake will be a memorable treat!
Pink Velvet Cake Recipe FAQs
How do I choose the right ripeness or type of ingredients?
Absolutely! When selecting your ingredients, ensure your eggs are at room temperature for better incorporation into the batter. For flour, I recommend using all-purpose flour, avoiding over-measurement to prevent dryness. Fresh baking powder and baking soda are key—check the expiration date for effectiveness. For the cocoa powder, use unsweetened to achieve that delightful flavor without overwhelming the sweetness of your Pink Velvet Cake.
What’s the best way to store Pink Velvet Cake?
To keep your Pink Velvet Cake fresh, store it in an airtight container at room temperature for up to 2 days. If you want to extend its life, place it in the fridge for up to 5 days. Make sure it’s well-covered to avoid absorbing any fridge odors. This will help maintain its moist and tender texture.
Can I freeze Pink Velvet Cake?
Absolutely! If you want to preserve your delicious Pink Velvet Cake for future enjoyment, wrap it tightly in plastic wrap and place it in the freezer. It can be stored for up to 3 months. When you’re ready to enjoy it, thaw the cake in the fridge overnight for the best texture. Just be sure to let it come to room temperature before serving for maximum flavor!
What if my cake turns out dry or too dense?
Very! If your Pink Velvet Cake ends up dry or dense, it could be due to overbaking or incorrect measurement of flour. Always check for doneness a few minutes before the suggested baking time. If you find your cake is too dense, ensure that you are properly creaming the butter and sugar, which incorporates air into the batter. Use a scale to accurately measure ingredients to prevent moisture loss.
Are there any dietary considerations or allergies I should be aware of?
When preparing your Pink Velvet Cake, be mindful of common allergens. This recipe contains gluten, dairy, and eggs. For a gluten-free version, you can substitute all-purpose flour with a gluten-free flour blend and ensure that your baking powder is gluten-free as well. Moreover, consider using dairy-free cream cheese and milk alternatives for those with lactose intolerance or dairy allergies. Enjoying your cake with accommodations is absolutely possible!

Pink Velvet Cake: A Delightfully Soft Celebration Treat
Ingredients
Equipment
Method
- In a small bowl, combine 1 cup of milk with 1 tablespoon of white vinegar, stirring gently. Let it sit for about 5 minutes.
- In a large mixing bowl, sift together the all-purpose flour, cornflour, cocoa powder, baking powder, baking soda, and salt.
- Using a stand mixer, beat 1 cup of softened butter and 2 cups of fine sugar together until pale and fluffy, about 3 to 5 minutes.
- With the mixer on low speed, add the large eggs one at a time. Mix in 1 teaspoon of vanilla essence and ½ cup of vegetable oil until smooth.
- Gradually add the prepared tangy milk and gently fold in the sifted dry ingredients until smooth.
- Divide the batter evenly into prepared cake pans. Bake in a preheated oven at 180°C (350°F) for 30 to 35 minutes.
- In a medium bowl, beat together 8 oz of cream cheese, ½ cup of softened butter, 4 cups of icing sugar, and 1 teaspoon of vanilla essence until creamy.
- Once the cake layers have cooled, spread cream cheese frosting between the layers and on the top and sides of the cake.
- Refrigerate the assembled cake for about 20 minutes to set the frosting. Decorate with raspberries and biscuits.