

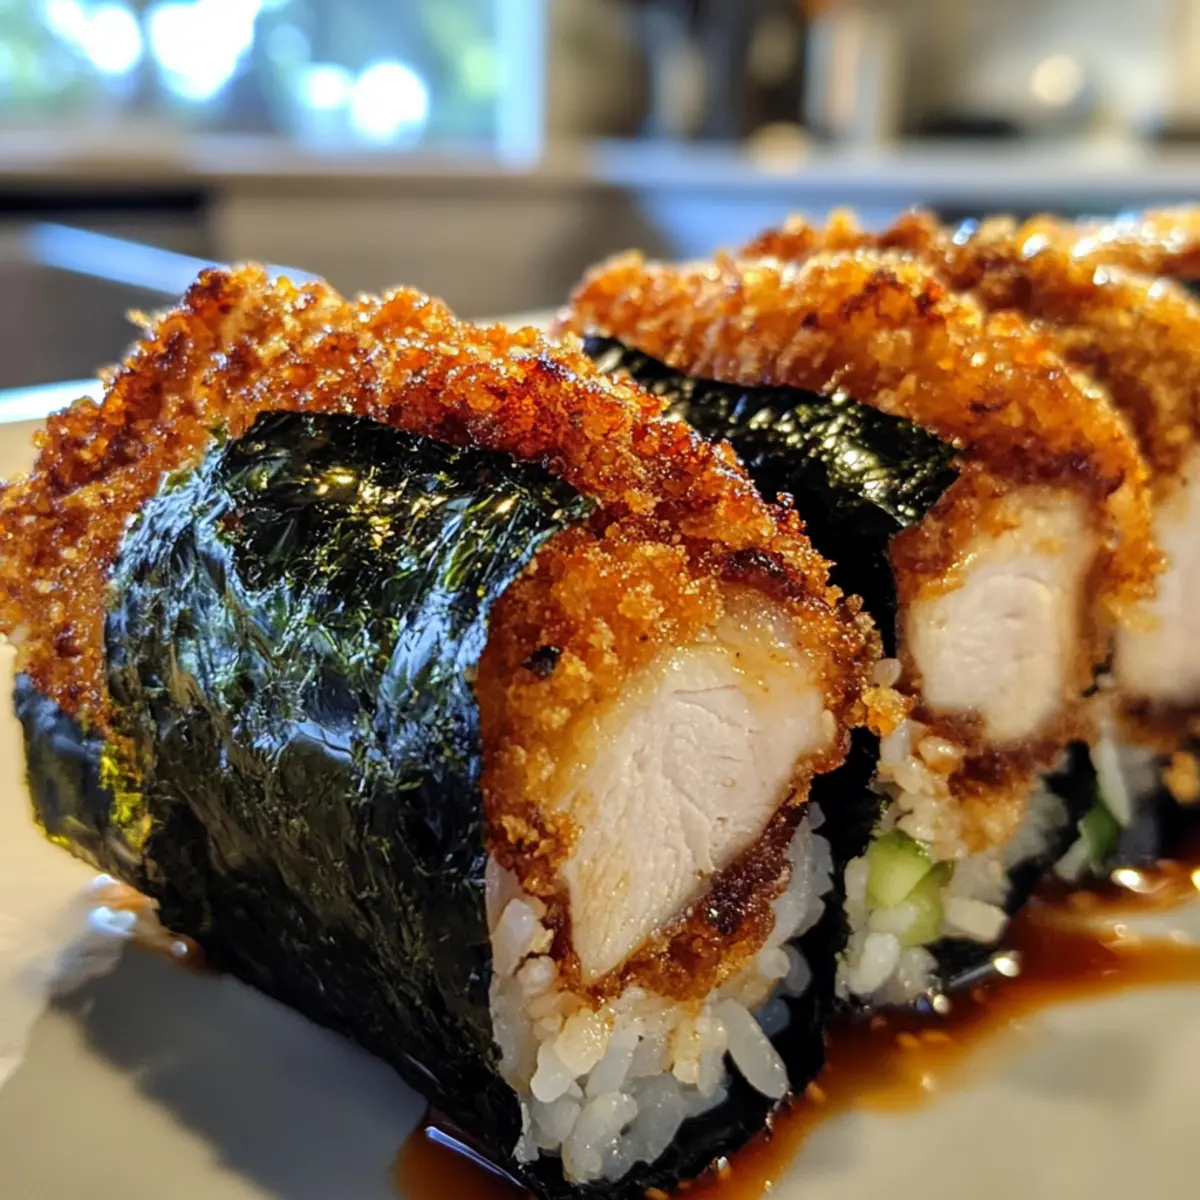
As I delicately cut into the first piece of Chicken Katsu Musubi, the satisfying crunch of breaded chicken meets the soft, sticky sushi rice in a glorious harmony of textures. This savory Japanese snack captures the essence of a comforting homemade meal, making it the perfect lunchtime companion or a delightful on-the-go bite. Not only is this Chicken Katsu Musubi incredibly simple to whip up, but it’s also a healthy alternative to typical fast-food options, offering a protein-packed punch without the guilt. Plus, with its customizable nature, you can easily adapt it to suit your personal taste, whether by swapping chicken for crispy tofu or drizzling on spicy mayo. Ready to dive into this delicious culinary adventure that perfectly balances tradition with a modern twist? Let’s get cooking!
Why is Chicken Katsu Musubi a must-try?
Crunchy, flavorful delight: This Chicken Katsu Musubi combines crispy chicken with perfectly sticky sushi rice for a taste explosion that’s hard to resist.
Quick and easy: Ideal for busy weekdays, you can whip it up in under 30 minutes, making it a fantastic choice for lunch or a snack.
Customizable to your taste: Whether you want to substitute chicken with tofu or add unique sauces, the possibilities are endless.
Perfect for sharing: Pack them in lunchboxes or bring them to picnics, they’re sure to impress everyone!
Healthy alternatives: With fresh ingredients and high protein content, this recipe is a guilt-free indulgence compared to traditional fast food options.
For more delicious chicken recipes, check out my Grilled Chicken Sandwich or Bbq Chicken Grilled options!
Chicken Katsu Musubi Ingredients
For the Chicken
• Boneless Skinless Chicken Thighs – This is the primary protein source, offering tenderness; you can substitute with chicken breasts for a leaner option.
• Large Eggs – They bind the batter, ensuring a crispy coating; consider flax eggs for a vegan alternative.
• All-Purpose Flour – Essential for dredging the chicken; gluten-free flour is a suitable alternative.
• Salt – Enhances overall flavor; opt for sea salt or kosher salt for a better taste.
• Ground Black Pepper – Adds a hint of heat; freshly ground pepper is recommended for the best flavor.
• Panko Breadcrumbs – Provides the signature crunch of katsu; regular breadcrumbs can be used, although the texture will differ.
• Neutral Oil (for frying) – Aids in frying; choose oils with high smoke points like canola or vegetable oil.
For the Musubi
• Nori Sheets – Wraps the musubi and should be cut into thirds; substitute with soy paper or lettuce leaves if necessary.
• Cooked Sushi Rice – Base for the musubi, giving a sticky yet firm texture; use short-grain rice for optimal results.
• Tonkatsu Sauce – Essential for adding umami flavor; consider making a homemade version with ketchup and soy sauce for a unique twist.
This Chicken Katsu Musubi recipe is a delightful journey into Japanese cuisine that you won’t want to miss!
Step‑by‑Step Instructions for Chicken Katsu Musubi
Step 1: Prepare the Chicken
Begin by pounding the boneless skinless chicken thighs to an even ½-inch thickness using a meat mallet or rolling pin. This ensures the chicken cooks evenly. Once flattened, season both sides generously with salt and ground black pepper, allowing the flavors to absorb while you set up the batter station.
Step 2: Make the Batter
In a mixing bowl, whisk together the large eggs, all-purpose flour, a pinch of salt, and black pepper until the mixture is smooth and slightly looser than pancake batter. This combination will provide a crispy coating to your chicken katsu. Prepare your workspace with the seasoned chicken, batter, and panko breadcrumbs alongside for easy dipping.
Step 3: Dredge the Chicken
Take each piece of seasoned chicken and first dip it into the batter, ensuring it is evenly coated. Let excess batter drip off, then transfer the chicken to the panko breadcrumbs. Press the breadcrumbs onto the chicken, ensuring a thick layer covers each piece for that satisfying crunch characteristic of Chicken Katsu.
Step 4: Fry the Chicken
Heat a deep skillet or frying pan over medium-high heat and add enough neutral oil to cover the bottom (about ½ inch deep). Once the oil reaches 350°F, carefully add the breaded chicken pieces, frying them in batches for 4-6 minutes, or until they are golden brown and crispy. Flip halfway through, then place cooked chicken on a wire rack to cool slightly.
Step 5: Prepare the Sushi Rice
While the chicken is cooling, prepare your sushi rice by cooking short-grain rice according to package instructions, typically rinsing and simmering. Once cooked, allow the rice to cool to a warm temperature. This sticky texture is essential for assembling the Chicken Katsu Musubi.
Step 6: Assemble the Musubi
For assembling, moisten a Spam can or musubi mold with water to prevent sticking. Gently pack approximately ½ cup of sushi rice into the bottom of the mold, pressing it tightly. Carefully remove the mold, leaving a rice base to work with.
Step 7: Add the Chicken and Sauce
Spread a layer of tonkatsu sauce over the rice, then place a piece of the crispy fried chicken on top. Ensure the chicken is fully centered, adding an extra touch of flavor to match the savory elements of the Chicken Katsu Musubi.
Step 8: Wrap with Nori
Cut your nori sheets into thirds and dampen the edges with a little water to help seal. Wrap the nori around the rice and chicken tightly, pressing gently to secure the musubi together. The nori should slightly overlap, ensuring your Chicken Katsu Musubi stays intact while serving.
Step 9: Serve or Store
Slice the Chicken Katsu Musubi in half for easier handling or serve whole. These delightful snacks can be enjoyed warm or at room temperature, perfect for lunchboxes or picnics. If storing, keep in an airtight container in the refrigerator for up to two days, but for best flavor and texture, enjoy fresh.

Expert Tips for Chicken Katsu Musubi
-
Pound Evenly: Ensure the chicken is pounded to an even ½-inch thickness. This helps achieve consistent cooking and a delightful texture.
-
Check Temperature: Use a meat thermometer to ensure the chicken reaches an internal temperature of 165°F to avoid any foodborne illnesses.
-
Batch Frying: Fry the chicken in small batches to maintain the oil temperature, ensuring each piece gets that perfect crispy coating.
-
Prevent Sticking: Moisten your surfaces and tools with water when assembling the musubi. This helps the rice and nori to release easily and prevents unwanted mess.
-
Feel Free to Customize: Don’t hesitate to experiment with different proteins or sauces. Chicken Katsu Musubi is versatile and can easily reflect your personal taste!
How to Store and Freeze Chicken Katsu Musubi
Fridge: Store in an airtight container for up to 2 days to maintain freshness. Enjoy the Chicken Katsu Musubi warm or at room temperature.
Freezer: For longer storage, wrap each musubi tightly in plastic wrap and place them in a freezer-safe bag. They can be frozen for up to 1 month.
Reheating: To reheat, remove plastic wrap and bake in a preheated oven at 350°F for about 10-15 minutes, or until heated through for that crispy texture.
Avoid sogginess: If storing, keep the nori separate until ready to eat to prevent it from getting soft.
Make Ahead Options
These Chicken Katsu Musubi are perfect for meal prep enthusiasts! You can prepare the chicken and fry it up to 24 hours in advance; just allow it to cool fully, then store it in an airtight container in the refrigerator to maintain its crunch. The sushi rice can also be made ahead and stored at room temperature for up to 3 days, but ensure to wrap it tightly to keep it from drying out. When ready to assemble, simply slice the chicken and layer it over the rice with tonkatsu sauce before wrapping with nori. This approach allows you to enjoy a delicious, homemade Chicken Katsu Musubi with minimal effort on busy weeknights!
What to Serve with Crunchy Chicken Katsu Musubi
Elevate your dining experience with delightful sides and drinks that perfectly complement the rich flavors of your Chicken Katsu Musubi.
-
Fresh Cucumber Salad: A refreshing, crunchy side that adds a burst of vibrant flavor while balancing the richness of the fried chicken.
-
Edamame: Lightly salted, steamed edamame provides a healthy, protein-packed snack that complements the meal without overpowering it.
-
Miso Soup: Warm and savory, this classic Japanese soup offers umami goodness, setting a comforting tone and enhancing the overall meal experience.
-
Pickled Vegetables: The tanginess of pickled veggies harmonizes beautifully with the savory musubi, cutting through the richness for a well-rounded bite.
-
Sesame Spinach: A simple side of sautéed spinach with sesame seeds adds both color and nutrition, creating a well-balanced plate alongside the musubi.
-
Teriyaki Glazed Tofu: For a vegetarian option, teriyaki glazed tofu matches the musubi’s flavors while providing an additional playful texture to the meal.
-
Japanese Green Tea: Light and aromatic, this soothing drink pairs perfectly with your Chicken Katsu Musubi, amplifying its savory notes and cleansing the palate.
-
Mochi Ice Cream: As a sweet ending, this creamy dessert offers a delightful contrast to the savory chicken katsu, leaving you with a satisfying finish to the meal.
Variations of Chicken Katsu Musubi
Feel free to let your creativity shine and transform this Chicken Katsu Musubi into a dish that fits your palate perfectly!
-
Dairy-Free: Substitute traditional egg with a flax egg for a vegan-friendly option. It’s an easy swap that keeps the crunch without the dairy.
-
Gluten-Free: Opt for gluten-free flour and panko breadcrumbs to enjoy this dish safely. You won’t sacrifice crunch or flavor with these fantastic alternatives.
-
Spicy Twist: Drizzle sriracha or spicy mayo on top of the chicken for a fiery kick. This little addition can elevate your musubi from ordinary to extraordinary.
-
Flavor Boost: Replace tonkatsu sauce with homemade teriyaki sauce for a sweeter, more complex flavor profile. This change will add a delightful twist to your musubi that you won’t want to miss.
-
Extra Crunch: Incorporate thinly sliced pickled vegetables like cucumber or daikon within the musubi for an added layer of texture and freshness. They complement the crispy chicken beautifully.
-
Protein Variety: Swap chicken with crispy tofu or flaky fish like salmon for a different protein-packed option. Each alternative brings its unique flavor that adds to the experience.
-
Sweet Element: Consider drizzling some honey or a sprinkle of sesame seeds for a subtle sweetness. It balances the savory elements and makes each bite delightful.
If you’re in the mood for more delicious wraps, check out my Grilled Chicken Sandwich or my Bbq Chicken Grilled recipes for fantastic meal ideas that are just as customizable!
Chicken Katsu Musubi Recipe FAQs
What kind of chicken should I use for Chicken Katsu Musubi?
For the best results, I recommend using boneless skinless chicken thighs as they offer tenderness and flavor. If you prefer a leaner option, chicken breasts work well too, just be sure to pound them to an even thickness for consistent cooking.
How should I store leftover Chicken Katsu Musubi?
To keep your Chicken Katsu Musubi fresh, store it in an airtight container in the refrigerator for up to 2 days. It’s best enjoyed warm or at room temperature. If you’re in a hurry, you can reheat it in the oven at 350°F for about 10-15 minutes to help regain that delightful crunch.
Can I freeze Chicken Katsu Musubi?
Absolutely! To freeze, wrap each musubi tightly in plastic wrap and place them in a freezer-safe bag. They can be frozen for up to 1 month. When you’re ready to eat, remove the plastic wrap and bake them in a preheated oven at 350°F for about 10-15 minutes to warm through and restore their crispy texture.
What should I do if my chicken isn’t cooking evenly?
If your chicken isn’t cooking evenly or is burning on the outside before being done on the inside, ensure it is pounded to an even thickness. Also, try frying in smaller batches to maintain the oil temperature, which can ensure even cooking. If necessary, reduce your cooking heat a bit to allow the chicken to fry longer without burning.
Is it okay to eat leftover Chicken Katsu Musubi with pets?
While the Chicken Katsu Musubi is safe for humans, it’s best to avoid sharing with pets, especially due to the seasoning and sauces used. Ingredients like salt and sauces can harm pets in larger amounts, so it’s wise to keep this delicious treat just for you!
What’s the best way to prevent my nori from getting soggy?
To prevent the nori from becoming soggy, keep it separate until you’re ready to serve the Chicken Katsu Musubi. If you’ve already assembled them and need to store them, try placing a piece of parchment paper between the nori and the musubi to allow for some airflow.
Savory Chicken Katsu Musubi: Crispy Japanese Comfort Food
Ingredients
Equipment
Method
- Pound chicken thighs to ½-inch thickness and season with salt and pepper.
- Whisk eggs, flour, salt, and pepper until smooth for the batter.
- Dredge chicken in batter, then coat with panko breadcrumbs.
- Heat oil in skillet and fry breaded chicken for 4-6 minutes until golden brown.
- Prepare sushi rice according to package instructions and let cool.
- Pack sushi rice into the mold for the base of the musubi.
- Add tonkatsu sauce and a piece of fried chicken on top of the rice.
- Wrap with nori, moistening edges to seal properly.
- Slice musubi for easier handling or serve whole.