

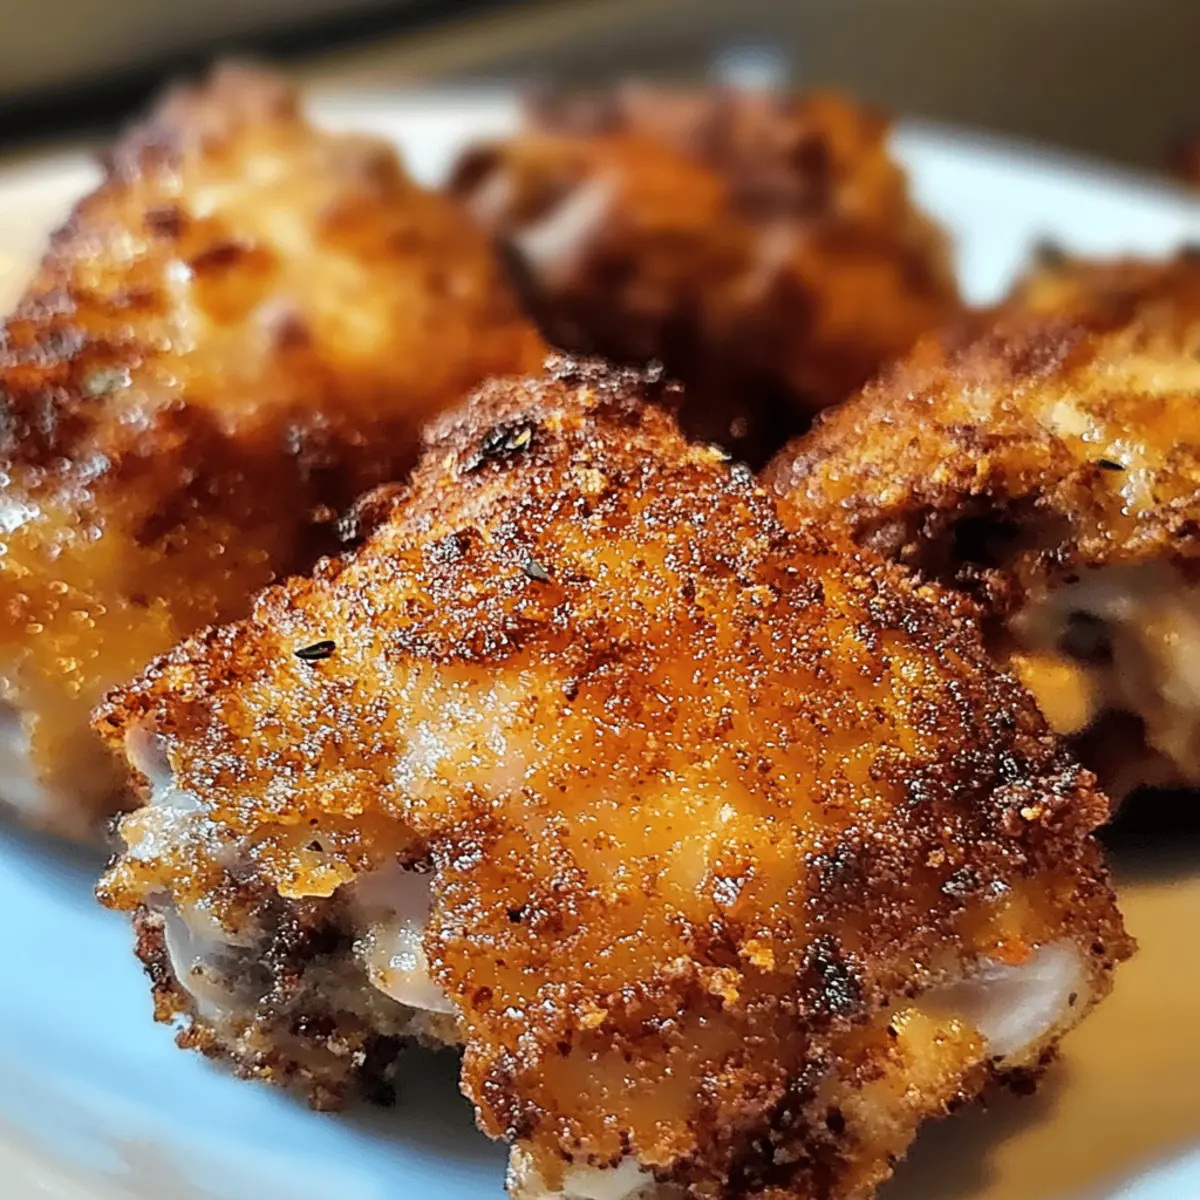
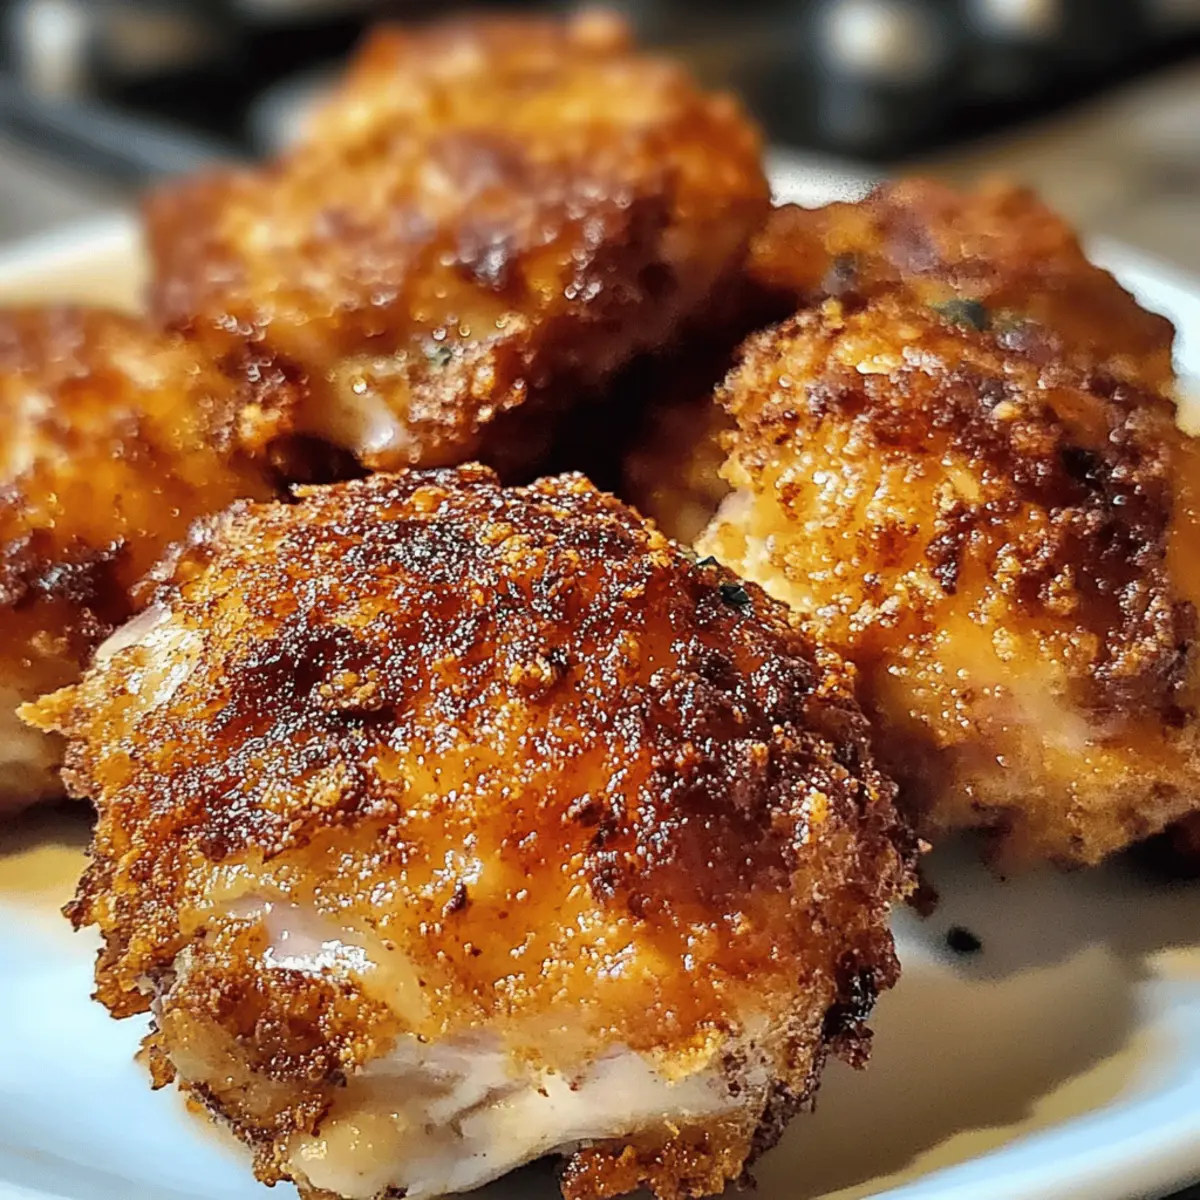
As I stood in my kitchen, the aroma of roasting chicken wafted through the air, igniting memories of hearty family dinners. The star of the evening? Extra Crispy Irish Oven-Fried Chicken Thighs—a dish that marries comfort food with a healthier twist. By using the oven instead of a fryer, I can savor that delightful crunch without the heavy oiliness or extensive cleanup associated with traditional frying. The juicy, tender chicken thighs are paired with a crispy, golden exterior that’s simply irresistible. This recipe not only brings a taste of Ireland to your table but also makes for a quick and family-friendly meal option, perfect for busy weeknights. Are you ready to bring a little Irish cheer to your dinner table? Let’s dive into this crispy delight together!

Why Are These Chicken Thighs So Crispy?
Crispy Perfection: This recipe achieves a delectable crunch without the guilt of deep frying.
Family-Friendly: Perfect for all ages, these oven-fried thighs are a hit with both kids and adults alike.
Quick Prep Time: With minimal time spent on prep, your family can enjoy a wholesome dinner in no time.
Healthier Option: Using less oil and cooking in the oven makes this a heart-smart choice compared to traditional frying.
Versatile Pairing: Serve with classic sides like mashed potatoes or a tangy slaw for a complete, satisfying meal. Don’t forget to check out my Bbq Chicken Roasted Sweet Potato Bowls for another delicious side!
Crispy Irish Oven-Fried Chicken Thighs Ingredients
For the Chicken
• Chicken Thighs – Use bone-in, skin-on for optimal juiciness and the best crispy texture.
• Buttermilk – A key player for marinating; it tenderizes and infuses flavor. Substitute with milk mixed with vinegar if necessary.
For the Breading
• Panko Breadcrumbs – These add that exceptional crunch that makes the thighs irresistible—regular breadcrumbs can be used but will be less crispy.
• All-Purpose Flour – This creates a solid base for the breading, ensuring it adheres well to your chicken. For a gluten-free option, swap in gluten-free flour.
For Seasoning
• Salt – Enhances overall flavor; kosher salt is recommended for better texture.
• Black Pepper – Fresh cracked pepper gives a burst of seasoning; aim for the freshest you can find.
• Smoked Paprika – Provides a lovely smoky flavor to the coating; you can substitute with regular paprika if needed.
• Dried Thyme – Adds earthy undertones; feel free to replace with Italian seasoning for variety.
• Garlic Powder – Imparts subtle garlic notes; if you prefer fresh, you can use minced garlic but adjust the quantity.
For Moisture & Crisp
• Melted Butter – Drizzle this on for an extra layer of flavor and crunch; you can use olive oil as a healthier alternative.
With these ingredients at hand, you’re on your way to creating the most crispy Irish oven-fried chicken thighs that will have your family asking for seconds!
Step‑by‑Step Instructions for Crispy Irish Oven-Fried Chicken Thighs
Step 1: Preheat the Oven
Begin by preheating your oven to 425°F (220°C). To prepare for the crispy Irish oven-fried chicken thighs, line a large baking sheet with parchment paper and lightly grease it with cooking spray or oil. This will keep the chicken from sticking and help achieve that beautiful golden crust we’re aiming for.
Step 2: Marinate the Chicken
In a spacious bowl, add your bone-in, skin-on chicken thighs to the buttermilk, ensuring each piece is completely submerged. Let the chicken marinate for at least 15 minutes—this crucial step enhances the flavor and ensures tenderness. As the chicken soaks, it will absorb the buttermilk’s richness, creating the perfect base for that crispy coating.
Step 3: Prepare the Breading Mixture
While the chicken is marinating, prepare the coating by combining panko breadcrumbs, all-purpose flour, salt, black pepper, smoked paprika, dried thyme, and garlic powder in a shallow dish. Mix thoroughly to ensure even seasoning throughout. The panko will provide exceptional crunch, making this breading ideal for our crispy Irish oven-fried chicken thighs.
Step 4: Dredge the Chicken
After marinating, remove each chicken thigh from the buttermilk, allowing the excess to drip off. Dredge each piece thoroughly in the breadcrumb mixture, pressing gently to ensure the coating adheres well to the chicken. This step is key to achieving that irresistible crunch, so take your time coating each thigh before moving on.
Step 5: Arrange the Chicken on the Baking Sheet
Once all the chicken thighs are coated, arrange them in a single layer on the prepared baking sheet. Ensure there is space between each piece to allow for even cooking. For an extra touch of rich flavor, drizzle melted butter over the top of each thigh, enhancing the crispiness as they roast in the oven.
Step 6: Bake Until Golden and Crispy
Place the baking sheet in the preheated oven and bake for approximately 40 minutes. Keep an eye on the chicken; it should become a beautiful golden brown, indicating the crispy Irish oven-fried chicken thighs are nearly ready. To ensure they are perfectly cooked, use a meat thermometer to check that the internal temperature reaches 165°F (74°C).
Step 7: Rest and Serve
Once baked to perfection, remove the chicken thighs from the oven and let them rest for a few minutes. This resting period allows the juices to redistribute, ensuring each bite is succulent. Serve the crispy Irish oven-fried chicken thighs with your favorite sides, and watch as your family enjoys every deliciously crunchy morsel!
Storage Tips for Crispy Irish Oven-Fried Chicken Thighs
- Room Temperature: Best enjoyed fresh, but if left out, consume within 2 hours to prevent bacterial growth.
- Fridge: Store any leftovers in an airtight container for up to 2–3 days. This keeps the chicken moist and flavorful.
- Freezer: For longer storage, freeze the cooked chicken in a single layer on a baking sheet, then transfer to an airtight container or freezer bag for up to 2 months.
- Reheating: To maintain that crispy texture, reheat in the oven at 375°F (190°C) for about 10–15 minutes, or until warmed through.
What to Serve with Extra Crispy Irish Oven-Fried Chicken Thighs
Elevate your meal with delightful sides that perfectly balance the crunchy goodness of the chicken.
-
Creamy Mashed Potatoes: The smooth, buttery texture of mashed potatoes complements the crispy exterior of the chicken, creating a comforting contrast.
-
Garlic Green Beans: Fresh green beans sautéed with garlic provide a vibrant flavor, adding a pop of color and nutrition to your plate.
-
Tangy Coleslaw: A refreshing coleslaw with a hint of vinegar cuts through the richness of the chicken, adding a delightful crunch and zing to each bite.
-
Buttery Corn on the Cob: Sweet corn brushed with melted butter enhances the meal’s flavor profile, becoming a family favorite alongside the crispy chicken.
-
Roasted Seasonal Vegetables: A medley of roasted carrots, zucchini, and bell peppers brings both texture and sweetness, creating a wholesome balance with the savory chicken.
-
Iced Lemonade: Chill out with a glass of iced lemonade; its refreshing zesty taste pairs perfectly with the hearty flavors of crispy Irish oven-fried chicken thighs.
Serve these delightful sides for a well-rounded meal that will keep your family asking for more!
Make Ahead Options
These Extra Crispy Irish Oven-Fried Chicken Thighs are a fantastic option for meal prep aficionados! You can marinate the chicken in buttermilk up to 24 hours in advance, allowing for enhanced flavor and tenderness. Once marinated, you can prepare the breadcrumb mixture and store it separately in an airtight container for up to 3 days. When you’re ready to enjoy this comforting dish, simply dredge the marinated chicken in the breadcrumb mixture, arrange it on the baking sheet, and drizzle with melted butter before baking. This approach not only saves you time during busy weeknights but also ensures your chicken is just as delicious and crispy as if made fresh!
Expert Tips for Crispy Irish Oven-Fried Chicken Thighs
• Use a Wire Rack: Elevating the chicken on a wire rack allows hot air to circulate, resulting in an extra crispy exterior.
• Marinate Longer: For maximum flavor and tenderness, consider marinating the chicken in buttermilk for up to 24 hours.
• Coat Thoroughly: Ensure each piece is evenly coated with the breadcrumb mixture, pressing gently to avoid sogginess. A well-coated chicken yields the best crispy Irish oven-fried chicken thighs.
• Monitor Cooking Time: Ovens can vary; check your chicken a few minutes before the end to prevent overcooking. Aim for a golden-brown crust.
• Rest the Chicken: Let the chicken rest for a few minutes after baking. This step keeps it juicy and ensures a perfect crunch upon biting in.
Crispy Irish Oven-Fried Chicken Thighs Variations
Feel free to get creative and customize these crispy oven-fried chicken thighs to suit your taste buds and dietary needs!
- Spicy Twist: Add cayenne pepper to the breading for a fiery kick. For those who love heat, this spice brings a delightful surprise and an exciting flavor profile.
- Herb-Infused: Swap out dried thyme for fresh herbs like rosemary or parsley to brighten the dish. Fresh herbs provide a burst of flavor that elevates the classic taste.
- Cheesy Delight: Incorporate grated Parmesan cheese into the breadcrumb mixture for a rich, savory depth. The cheesy coating adds an irresistible umami flavor that will have everyone asking for your secret.
- Gluten-Free Option: Substitute all-purpose flour and panko with gluten-free flour and breadcrumbs. This allows all dietary preferences to enjoy the same crispy delight!
- Citrus Zest: Incorporate lemon or lime zest in the breading for a refreshing twist. This brightens the dish and complements the savory notes beautifully.
- BBQ Flavor: Brush the chicken thighs with your favorite BBQ sauce before baking for a sweet and smoky flavor. This adds a fun twist reminiscent of summer cookouts. Don’t forget to try it with Bbq Chicken Roasted Sweet Potato Bowls for a complete meal!
- Sweet & Spicy: Mix in a pinch of brown sugar or honey to the breading for a sweet touch that pairs perfectly with savory chicken. The caramelization during baking adds an alluring crunch, making each bite addictive.
- Asian-Inspired: Use sesame seeds and soy sauce in the coating mix for an Asian-inspired twist. Pairing these flavors transports you to your favorite takeout spot—without the guilt!
With these variations, you can enjoy a new taste adventure each time you prepare this crispy dish!

Extra Crispy Irish Oven-Fried Chicken Thighs Recipe FAQs
What type of chicken is best for this recipe?
For the crispiest result, use bone-in, skin-on chicken thighs. This combination keeps the meat juicy while the skin crisps up beautifully as it bakes, creating that satisfying crunch.
How do I store leftovers from the crispy Irish oven-fried chicken thighs?
Store any leftover chicken in an airtight container in the fridge for up to 2–3 days. To maintain moisture, wrap them individually in foil before placing them in the container. This helps keep each piece flavorful and reduces the risk of them drying out.
Can I freeze the crispy Irish oven-fried chicken thighs?
Absolutely! For freezing, allow the cooked chicken to cool completely, then arrange the pieces in a single layer on a baking sheet. Freeze them for about 1-2 hours, or until firm. Once frozen, transfer the chicken to an airtight container or freezer bag, where they can be stored for up to 2 months. When ready to eat, reheat in the oven to restore their crispy texture.
What can I do if the coating isn’t as crispy as I’d like?
If the coating doesn’t turn out crispy enough, check a few things. Ensure you used panko breadcrumbs for maximum crunch, and make sure your oven was preheated to the right temperature. For next time, consider elevating the chicken on a wire rack during baking, allowing air to circulate around the chicken for even crispiness.
Are there any dietary considerations I should be aware of?
This recipe contains gluten due to the all-purpose flour and panko. For a gluten-free option, substitute with gluten-free flour and certified gluten-free panko breadcrumbs. Additionally, if there are concerns about dairy, use a dairy-free milk mixed with vinegar instead of buttermilk for marinating.
How do I ensure my chicken skin stays crispy after reheating?
When reheating, avoid the microwave, as it can make the skin soggy. Instead, place the chicken on a baking sheet in a preheated oven at 375°F (190°C) for about 10–15 minutes. This will help regain that lovely crispiness you enjoyed when it was freshly baked.
Irresistibly Crispy Irish Oven-Fried Chicken Thighs Recipe
Ingredients
Equipment
Method
- Preheat your oven to 425°F (220°C). Line a large baking sheet with parchment paper and lightly grease it.
- Marinate the chicken in buttermilk for at least 15 minutes.
- Prepare the breading mixture by combining panko breadcrumbs, flour, salt, pepper, paprika, thyme, and garlic powder.
- Dredge each chicken thigh in the breadcrumb mixture after marinating.
- Arrange the coated thighs on the baking sheet and drizzle melted butter over them.
- Bake for approximately 40 minutes or until golden brown and cooked through to 165°F (74°C).
- Allow the chicken to rest for a few minutes before serving.