

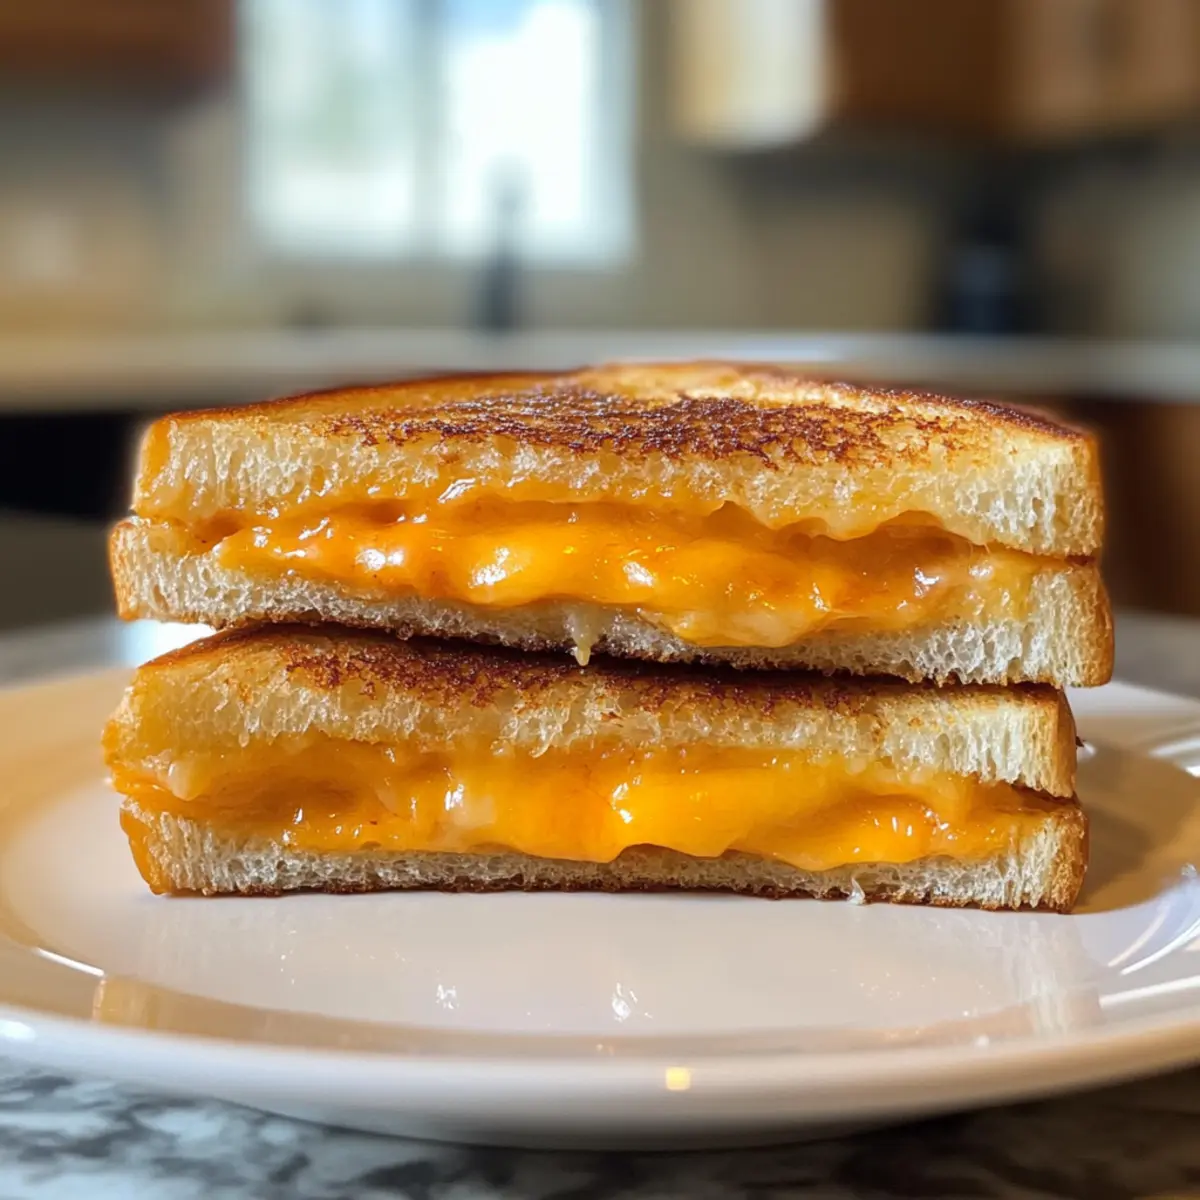
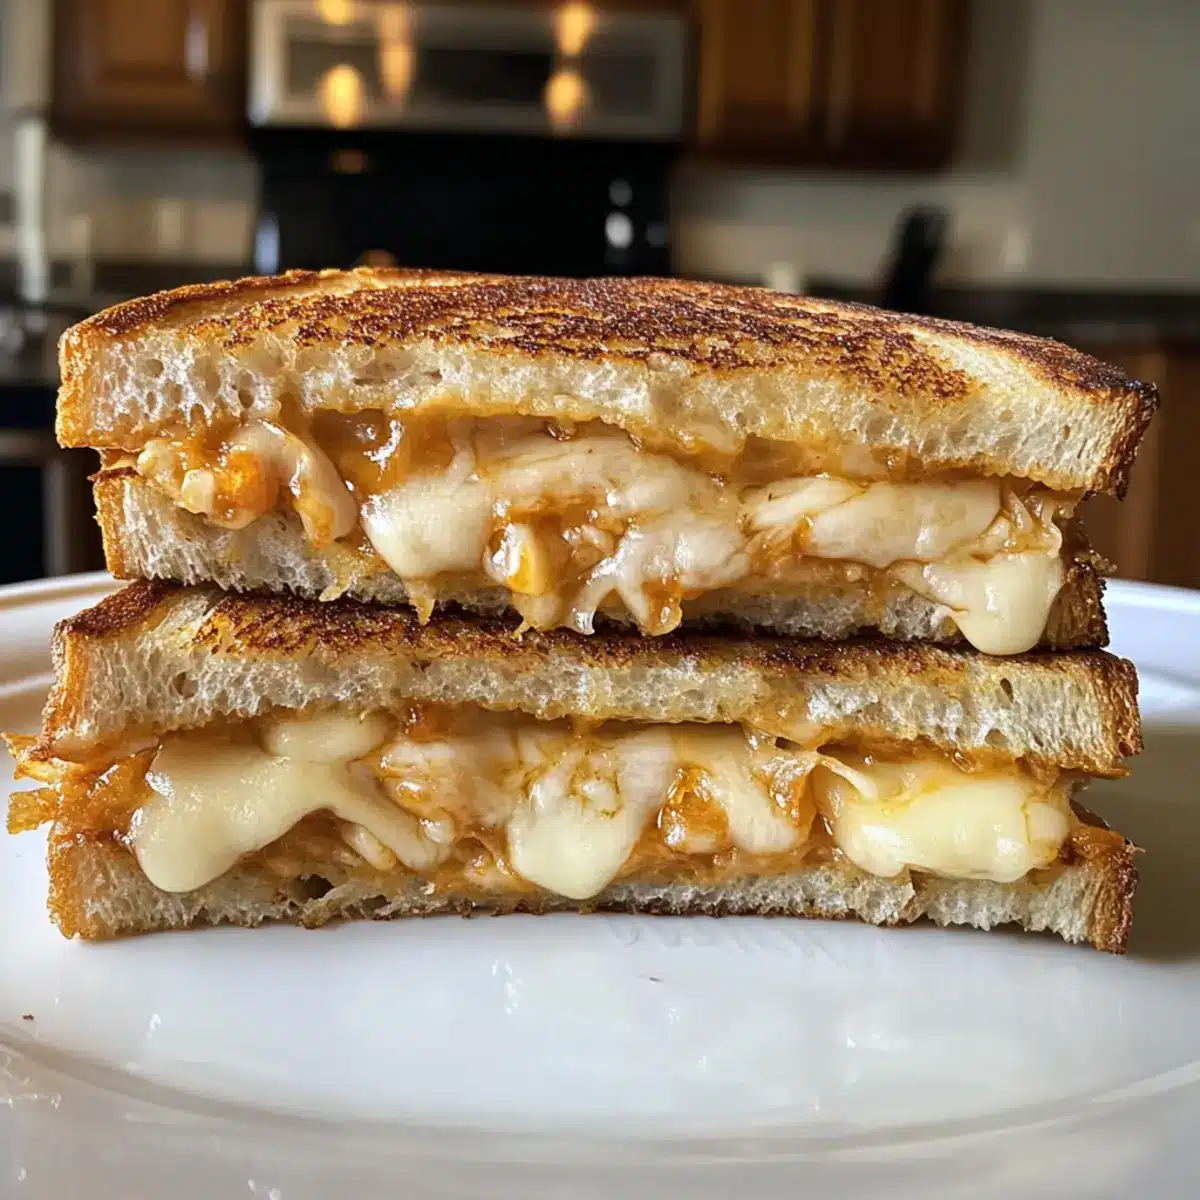
As I took my first bite, the sweet aroma of warm Hawaiian rolls mingled with gooey melted cheese, transporting me straight to a sun-drenched beach. This Hawaiian Roll Grilled Cheese is not just any sandwich; it’s a delightful fusion of comfort food that celebrates tropical flavors in every layer. The beauty of this recipe lies in its simplicity—you can whip it up in no time for a cozy dinner or a midweek treat that feels like a culinary vacation. Plus, it’s easily customizable, allowing your creative side to shine through as you experiment with different cheeses and toppings. What will you choose to add for your version of this comforting classic?

Why is Grilled Cheese So Comforting?
Unmatched Comfort: There’s nothing like sinking your teeth into a warm, gooey sandwich that oozes with melted cheese, especially when it’s nestled between sweet Hawaiian rolls. Customization Galore: Choose from an array of cheeses and toppings to create your unique spin on this classic. Quick & Easy: In just minutes, you can prepare a comforting meal that satisfies the entire family. Perfectly Crispy: The buttery crust adds satisfying crunch to every bite, elevating your experience. Pair it with a bowl of tomato soup or a light salad for the ultimate cozy meal that feels like a hug from the inside out! You might also enjoy the flavors of Mexican Grilled Chicken as a side dish!
Hawaiian Roll Grilled Cheese Ingredients
For the Sandwich
Hawaiian Rolls – These sweet and soft rolls are perfect for holding the melted cheese and adding a tropical twist.
Cheese of Choice – Choose your favorite cheese for creaminess; mozzarella, cheddar, or pepper jack can bring delightful flavors.
Butter – Use unsalted butter to create that glorious golden crust; feel free to try flavored butters for an extra kick!
Optional Toppings
Caramelized Onions – These sweet and savory additions give a delicious depth of flavor to your Hawaiian Roll Grilled Cheese.
Crispy Bacon – A little crunch and salty goodness that enhances the overall taste and adds a heartiness to the sandwich.
Fresh Tomatoes – Brighten up your grilled cheese with a touch of freshness, making each bite even more enjoyable.
Elevate your comforting Hawaiian Roll Grilled Cheese experience with these delicious ingredients and optional variations!
Step‑by‑Step Instructions for Hawaiian Roll Grilled Cheese
Step 1: Prepare Ingredients
Start by gathering your Hawaiian rolls and cheese of choice. Slice the rolls partially in half, keeping the bottom intact to create a cozy pocket for the cheese. This step sets the foundation for your Hawaiian Roll Grilled Cheese, allowing for that gooey bliss that awaits once cooked!
Step 2: Heat the Pan
Preheat a non-stick skillet over medium heat, ensuring even cooking and preventing sticking. While the pan warms up, generously butter the insides of each Hawaiian roll. This buttery layer will create a golden, crispy crust, enhancing the flavors of your delightful grilled cheese.
Step 3: Assemble the Sandwiches
Once your skillet is hot, place the bottom half of each roll in the pan. Add your chosen cheese generously, and then cover with the top half of the roll, pressing down slightly to encourage even melting. This careful assembly will help the cheese adhere and create a satisfying sandwich.
Step 4: Grill Until Golden
Cook the sandwiches for about 3-4 minutes, or until the bottom is a beautiful golden brown. Use a spatula to gently lift and check the crust’s color, ensuring it doesn’t burn. The aroma will fill your kitchen, drawing everyone’s attention to this irresistible Hawaiian Roll Grilled Cheese!
Step 5: Melt the Cheese
Carefully flip each sandwich over, allowing the other side to cook for another 3-4 minutes. Keep an eye on color and crispness, and optionally cover the skillet with a lid to aid in the melting process. You’ll know they’re ready when both sides are golden and the cheese is delightfully gooey.
Step 6: Slice and Serve
Once cooked to perfection, remove the sandwiches from the skillet and let them cool for about a minute. Slice them in half to reveal the melty cheese inside, presenting them beautifully. Serve your Hawaiian Roll Grilled Cheese immediately, and consider pairing it with a tasty dip for an extra touch!
What to Serve with Hawaiian Roll Grilled Cheese?
Elevate your meal experience by adding complementary sides that balance richness and tantalize your taste buds.
Crispy Potato Wedges: A hearty and satisfying side, perfect for dipping in ketchup or your favorite sauce.
Refreshing Coleslaw: The crunch and tanginess of coleslaw provide a refreshing contrast to the warm, gooey cheese.
Tomato Soup: A classic pairing! The rich, savory flavors of tomato soup beautifully enhance the cheesy goodness of your sandwich.
Garlic Butter Mushrooms: Earthy and flavorful, sautéed mushrooms bring an umami punch that complements the sweetness of the rolls.
Mixed Green Salad: Light and vibrant, this salad adds a fresh touch that cuts through the rich, buttery sandwich.
Fruit Salad: Bright, juicy fruits add sweetness and acidity, balancing the indulgence of the grilled cheese.
Iced Tea or Lemonade: A sweet or tangy beverage brings a refreshing contrast to the warm, comforting sandwich.
Brownie Sundae: For a decadent dessert, a warm brownie topped with ice cream is a perfect way to end your meal on a sweet note.
How to Store and Freeze Hawaiian Roll Grilled Cheese
Fridge: Store leftover Hawaiian Roll Grilled Cheese in an airtight container for up to 2 days to retain freshness.
Freezer: For longer storage, wrap individual sandwiches tightly in plastic wrap and then in aluminum foil; freeze for up to 1 month.
Reheating: To reheat, thaw in the fridge overnight, then grill in a skillet over medium heat until warmed through and crispy, about 5-7 minutes.
Avoid sogginess: Prevent soggy bread by allowing grilled cheese to cool completely before storing, ensuring a delightful texture when you’re ready to enjoy it again!
Expert Tips for Hawaiian Roll Grilled Cheese
Heating is Key: Cook on medium-low heat to ensure the bread crisps up without burning, allowing the cheese to melt beautifully.
Gentle Flipping: Use a spatula to carefully flip your sandwich—this helps maintain its structure and prevents cheese spills!
Experiment with Cheese: Don’t hesitate to try different cheese combinations for your Hawaiian Roll Grilled Cheese to find your perfect flavor profile.
Add a Lid: Covering the skillet while grilling can help achieve a quicker melt, especially with thicker cheese slices, enhancing your gooey experience.
Flavor Variations: For an extra boost of flavor, consider adding toppings like caramelized onions or crispy bacon—this makes your grilled cheese even more irresistible!
Make Ahead Options
These Hawaiian Roll Grilled Cheese sandwiches are perfect for busy home cooks looking to save time! You can prepare the sandwiches up to 24 hours in advance by assembling them without grilling. Simply slice the Hawaiian rolls, layer your chosen cheese, and close them up. Wrap the sandwiches tightly in plastic wrap or store them in an airtight container in the refrigerator to maintain freshness. The key is to refrigerate them until you’re ready to grill to prevent the rolls from becoming soggy. When it’s time to eat, just heat your skillet, butter the outsides, and grill each side until golden brown and the cheese is perfectly melted. With these make-ahead options, you’ll enjoy delicious, gooey Hawaiian Roll Grilled Cheese with minimal effort!
Hawaiian Roll Grilled Cheese Twist
Feel free to personalize your Hawaiian Roll Grilled Cheese with these exciting variations, all set to tantalize your taste buds!
Cheese Variety: Choose from mozzarella, cheddar, or pepper jack for a flavor twist. Mix and match for your ideal cheesy delight!
Spicy Kick: Add sliced jalapeños or a sprinkle of crushed red pepper flakes for an extra fiery bite that complements the sweetness of the rolls.
Add Crunch: Toss in crispy bacon or fried shallots for that irresistible crunch that contrasts beautifully with the gooey cheese.
Herb Boost: Infuse your sandwich with fresh herbs such as basil or cilantro for a refreshing pop of freshness that elevates each bite.
Sweet Surprise: Spread a touch of fig jam or honey inside to enhance the sweet and savory flavors, creating a harmonious balance.
Vegetarian Delight: Load up on grilled mushrooms, spinach, or roasted red peppers, offering hearty textures and vibrant flavors without any meat.
Tomato Love: A fresh slice of tomato adds juiciness that contrasts beautifully with the crispy bread and melted cheese, enhancing overall flavor.
Nutty Twist: Substitute butter with garlic-infused olive oil for grilling, creating an aromatic crust with nutty undertones that enhance the sandwich’s richness.
Once you’ve customized your creation, you might also enjoy pairing this delightful sandwich with a fresh Spring Roll Salad or diving into a cozy bowl of creamy tomato soup for a comforting, complete meal!

Hawaiian Roll Grilled Cheese Recipe FAQs
How do I choose the right Hawaiian rolls?
Absolutely! When selecting Hawaiian rolls, look for ones that are soft and fresh with a slightly golden color. Avoid any rolls that have dark spots or feel dry. You can also substitute with brioche or sourdough for a different texture that still supports that scrumptious melted cheese.
What’s the best way to store leftover Hawaiian Roll Grilled Cheese?
Leftover Hawaiian Roll Grilled Cheese can be stored in an airtight container in the fridge for up to 2 days. Simply allow them to cool completely before placing them in the container to prevent sogginess. Reheat them in a skillet over medium heat for about 5-7 minutes until they are crispy and warmed through.
Can I freeze Hawaiian Roll Grilled Cheese?
Yes! For freezing, wrap each sandwich tightly in plastic wrap, then in aluminum foil to prevent freezer burn. You can freeze them for up to 1 month. When you’re ready to enjoy one, thaw it overnight in the fridge and then reheat in a skillet for that freshly grilled texture.
What should I do if the cheese isn’t melting properly?
If your cheese isn’t melting well, ensure you’re cooking over medium-low heat and not rushing the process. Covering the pan with a lid can help trap heat and moisture, making for a quicker melt. If you’re using thicker cheese slices, consider using a lower-fat cheese which often melts more easily.
Are there any allergy considerations with Hawaiian Roll Grilled Cheese?
Yes, it’s important to be mindful of your dietary needs! Hawaiian rolls generally contain gluten, so opt for gluten-free bread if needed. Additionally, if you or your guests are lactose intolerant, consider using lactose-free cheese alternatives. Always check labels to ensure safety from any allergens.
How can I customize my Hawaiian Roll Grilled Cheese further?
Customization galore! You can add ingredients such as caramelized onions, crispy bacon, or fresh tomatoes to elevate your Hawaiian Roll Grilled Cheese. Try various cheeses like pepper jack for a spicy kick or even switch up the bread completely for those playful culinary adventures!
Hawaiian Roll Grilled Cheese: A Gooey Twist on Comfort Food
Ingredients
Equipment
Method
- Start by gathering your Hawaiian rolls and cheese of choice. Slice the rolls partially in half, keeping the bottom intact to create a cozy pocket for the cheese.
- Preheat a non-stick skillet over medium heat, while generously buttering the insides of each Hawaiian roll.
- Once your skillet is hot, place the bottom half of each roll in the pan, add your chosen cheese, and cover with the top half of the roll.
- Cook the sandwiches for about 3-4 minutes, or until the bottom is golden brown.
- Carefully flip each sandwich over, allowing the other side to cook for another 3-4 minutes until both sides are golden and the cheese is gooey.
- Remove the sandwiches from the skillet, let them cool for about a minute, then slice in half to reveal the melty cheese inside.