

Introduction to Ice Cream Sandwich Cake
There’s something magical about desserts that bring back childhood memories. The Ice Cream Sandwich Cake is one of those delightful treats that can instantly transport you to sunny days filled with laughter and joy. It’s a quick solution for busy days when you want to impress your loved ones without spending hours in the kitchen. With just a few simple ingredients, you can create a stunning dessert that’s as fun to make as it is to eat. Trust me, this no-bake cake will become a favorite in your household!
Why You’ll Love This Ice Cream Sandwich Cake
This Ice Cream Sandwich Cake is a game-changer for dessert lovers. It’s incredibly easy to whip up, making it perfect for those hectic weeknights or last-minute gatherings. The layers of creamy ice cream and fluffy whipped cream create a taste sensation that’s hard to resist. Plus, you can customize it with your favorite toppings, ensuring everyone gets a slice of happiness. It’s a dessert that brings smiles without the stress!
Ingredients for Ice Cream Sandwich Cake
Gathering the right ingredients is the first step to creating your Ice Cream Sandwich Cake. Here’s what you’ll need:
- Ice Cream Sandwiches: The star of the show! Choose your favorite flavor, whether it’s classic vanilla, chocolate, or something adventurous like mint chocolate chip.
- Whipped Cream: This fluffy delight adds a light texture and balances the sweetness. You can use store-bought or whip your own for a fresher taste.
- Chocolate Syrup: A rich drizzle that brings everything together. Feel free to swap it out for caramel or fudge if you’re feeling indulgent.
- Crushed Cookies (optional): For a crunchy texture, add some crushed cookies. Oreos or graham crackers work beautifully.
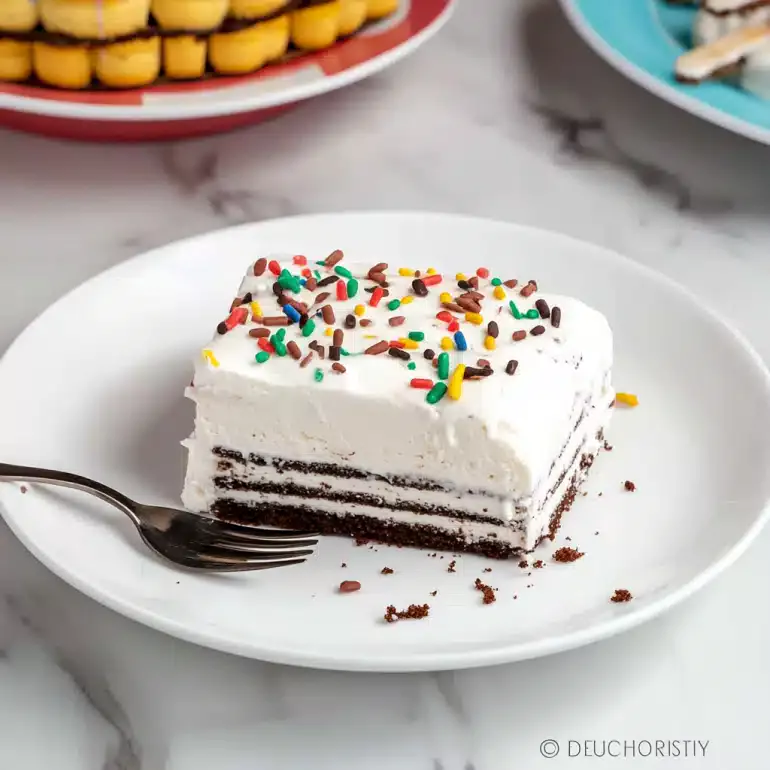
- Sprinkles (optional): These colorful bits are perfect for adding a festive touch. Use any type you like, from classic rainbow to chocolate.
For exact measurements, check the bottom of the article where you can find everything listed for easy printing. Get ready to create a dessert that’s not just delicious but also a blast to make!
How to Make Ice Cream Sandwich Cake
Creating your Ice Cream Sandwich Cake is a breeze! Follow these simple steps, and you’ll have a stunning dessert ready to impress. Let’s dive in!
Step 1: Prepare the Base
Start by laying 6 ice cream sandwiches in a single layer in a rectangular dish. Make sure they fit snugly, as this will be the foundation of your cake. If you want a more decadent base, consider using a mix of different flavored sandwiches for a fun twist!
Step 2: Add the First Layer of Whipped Cream
Spread half of the whipped cream over the ice cream sandwiches. Use a spatula for an even layer. This fluffy goodness adds a lightness that balances the richness of the ice cream. Don’t be shy—make it thick!
Step 3: Drizzle Chocolate Syrup
Now, drizzle half of the chocolate syrup over the whipped cream. Let it cascade down the sides for a beautiful effect. If you’re feeling adventurous, try using caramel or a mix of both syrups for an extra layer of flavor!
Step 4: Add Toppings
If you’re using crushed cookies and sprinkles, now’s the time to sprinkle them on top. Half of each will do. The cookies add a delightful crunch, while the sprinkles bring a pop of color. It’s all about making it visually appealing!
Step 5: Repeat the Layers
Repeat the layers with the remaining ice cream sandwiches, whipped cream, chocolate syrup, and toppings. This is where the magic happens! Each layer builds on the last, creating a deliciously stacked dessert that’s sure to wow your guests.
Step 6: Freeze and Serve
Cover the dish with plastic wrap and freeze for at least 4 hours or until firm. This step is crucial for achieving that perfect slice. When you’re ready to serve, slice it up and enjoy chilled. Garnish with additional toppings if desired, and watch everyone’s eyes light up!
Tips for Success
- Use a sharp knife to slice the cake for clean edges.
- Let the cake sit at room temperature for a few minutes before serving for easier slicing.
- Experiment with different ice cream sandwich flavors for a unique twist.
- For a richer taste, add layers of fudge or caramel sauce between the ice cream sandwiches.
- Make it a day ahead to save time and let the flavors meld beautifully.
Equipment Needed
- Rectangular Dish: A 9×13 inch dish works perfectly. If you don’t have one, any similar-sized container will do.
- Spatula: Essential for spreading whipped cream. A butter knife can work in a pinch.
- Plastic Wrap: To cover the dish while freezing. Aluminum foil is a good alternative.
Variations
- Fruit Layer: Add layers of fresh fruit like strawberries or bananas for a refreshing twist.
- Nutty Delight: Incorporate chopped nuts like almonds or walnuts for added crunch and flavor.
- Chocolate Lovers: Use chocolate ice cream sandwiches and add chocolate chips for an extra chocolatey experience.
- Vegan Option: Substitute regular ice cream sandwiches with dairy-free versions and use coconut whipped cream.
- Seasonal Flavors: Experiment with seasonal ice cream flavors, like pumpkin spice in the fall or peppermint in winter.
Serving Suggestions
- Pair with a scoop of vanilla ice cream for an extra creamy experience.
- Serve alongside fresh fruit like berries or sliced bananas for a refreshing contrast.
- Drizzle additional chocolate or caramel sauce on top for a decadent touch.
- Garnish with mint leaves for a pop of color and freshness.
- Present on a colorful platter to make it visually appealing at gatherings.

FAQs about Ice Cream Sandwich Cake
Can I make Ice Cream Sandwich Cake in advance?
Absolutely! This dessert can be made a day ahead. Just cover it well and store it in the freezer. It allows the flavors to meld beautifully, making it even more delicious when you serve it.
What can I use instead of whipped cream?
If you’re looking for alternatives, you can use whipped topping or even Greek yogurt for a healthier twist. Just keep in mind that the texture and flavor will vary slightly.
How long does Ice Cream Sandwich Cake last in the freezer?
This cake can last up to two weeks in the freezer if stored properly. Just make sure it’s well-covered to prevent freezer burn!
Can I customize the toppings?
Definitely! Feel free to get creative with your toppings. You can use nuts, different types of sprinkles, or even fresh fruit to make it your own.
Is this dessert suitable for kids?
Yes! Kids love Ice Cream Sandwich Cake. It’s fun, colorful, and a great way to get them involved in the kitchen. Just watch out for any allergies with the toppings!
Final Thoughts
Creating an Ice Cream Sandwich Cake is more than just whipping up a dessert; it’s about crafting memories. Each layer tells a story, from the first scoop of whipped cream to the final drizzle of chocolate syrup. This cake is perfect for gatherings, celebrations, or simply a sweet treat after a long day. The joy it brings is palpable, as friends and family gather around, smiles wide and laughter filling the air. So, roll up your sleeves, embrace the fun, and let this delightful dessert become a cherished part of your culinary adventures!
Ice Cream Sandwich Cake: A Delicious Dessert You’ll Love!
Ingredients
Method
- Start by laying 6 ice cream sandwiches in a single layer in a rectangular dish.
- Spread half of the whipped cream over the ice cream sandwiches.
- Drizzle half of the chocolate syrup over the whipped cream.
- If using, sprinkle half of the crushed cookies and sprinkles on top.
- Repeat the layers with the remaining ice cream sandwiches, whipped cream, chocolate syrup, and toppings.
- Cover the dish with plastic wrap and freeze for at least 4 hours or until firm.
- Slice and serve chilled, garnished with additional toppings if desired.
Nutrition
Notes
- Feel free to customize the toppings based on your preferences.
- This dessert can be made a day in advance for convenience.
- For a more decadent version, add layers of fudge or caramel sauce.