

Introduction to Ice Cream Sandwich Cake
Summer days call for something special, don’t they? When the sun is blazing and the kids are running wild, I crave a treat that’s both easy and delicious. That’s where my Ice Cream Sandwich Cake comes in. It’s a delightful dessert that requires no baking and is perfect for gatherings or just a sweet escape on a hot afternoon. With layers of creamy goodness and a crunch that surprises, this cake is sure to impress your loved ones. Plus, it’s a quick solution for those busy days when you want to whip up something memorable!
Why You’ll Love This Ice Cream Sandwich Cake
This Ice Cream Sandwich Cake is a game-changer for summer desserts. It’s incredibly easy to make, taking just 15 minutes of prep time. You won’t need to turn on the oven, which is a blessing during those sweltering days. The combination of creamy ice cream and crunchy toppings creates a flavor explosion that everyone will love. Plus, it’s a crowd-pleaser, making it perfect for parties or family gatherings!
Ingredients for Ice Cream Sandwich Cake
Gathering the right ingredients is half the fun of making this Ice Cream Sandwich Cake. Here’s what you’ll need:
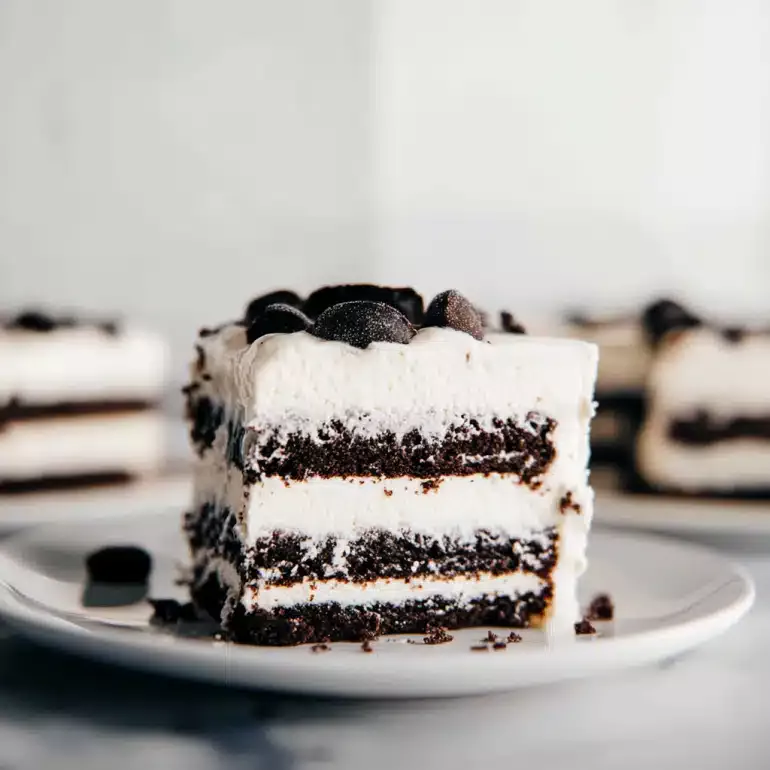
- Ice Cream Sandwiches: The star of the show! Choose your favorite flavor, whether it’s classic vanilla or something adventurous like mint chocolate chip.
- Whipped Topping: This fluffy layer adds creaminess and lightness. You can use store-bought or whip your own for a fresher taste.
- Chocolate Syrup: A drizzle of this sweet goodness brings everything together. Feel free to swap it out for caramel or strawberry syrup for a twist.
- Crushed Cookies: I love using Oreos for that extra crunch and flavor. But any cookie you adore will work—think graham crackers or chocolate chip!
- Chopped Nuts (optional): If you enjoy a nutty crunch, toss in some chopped walnuts or pecans. They add a delightful texture.
- Sprinkles (optional): These colorful little gems are perfect for a festive touch. They’re not just for kids; they make everything more fun!
For exact measurements, check the bottom of the article where you can find everything listed for easy printing. Now, let’s get to the fun part—making this delicious cake!
How to Make Ice Cream Sandwich Cake
Creating this Ice Cream Sandwich Cake is a breeze! Follow these simple steps, and you’ll have a delightful dessert ready to impress. Let’s dive in!
Step 1: Prepare the Baking Dish
Start by grabbing a 9×13 inch baking dish. Line the bottom with a layer of ice cream sandwiches. Make sure they fit snugly, covering the entire base. This will be the foundation of your cake, so get it right!
Step 2: Add the First Layer of Toppings
Next, take half of your whipped topping and spread it evenly over the ice cream sandwiches. Use a spatula for a smooth finish. This layer adds a creamy texture that balances the cake perfectly.
Step 3: Drizzle the Chocolate Syrup
Now, it’s time for the fun part! Drizzle half of the chocolate syrup over the whipped topping. Let it flow freely, creating a beautiful pattern. This sweet layer is what makes every bite irresistible!
Step 4: Sprinkle the Crunch
Grab your crushed cookies and sprinkle half of them over the chocolate syrup. If you’re using nuts, toss those in too! This adds a delightful crunch that contrasts beautifully with the creamy layers.
Step 5: Repeat the Layers
Now, it’s time to repeat the process. Add another layer of ice cream sandwiches, followed by the remaining whipped topping, chocolate syrup, and crushed cookies. This double-layer action makes the cake even more decadent!
Step 6: Final Touches
For the finishing touch, sprinkle some colorful sprinkles on top if you like. They add a festive vibe! Then, cover the dish with plastic wrap to keep everything fresh.
Step 7: Freeze and Serve
Place your cake in the freezer for at least 4 hours. This allows it to set perfectly. When you’re ready to serve, let it sit at room temperature for a few minutes. This makes cutting easier. Then, slice and enjoy your delicious Ice Cream Sandwich Cake!
Tips for Success
- Use a sharp knife to cut the cake for clean slices.
- Let the cake sit out for a few minutes before serving; it makes cutting easier.
- Experiment with different ice cream sandwich flavors for a unique twist.
- For a richer taste, try adding a layer of peanut butter or Nutella.
- Keep leftovers covered in the freezer for up to a week.
Equipment Needed
- 9×13 inch baking dish: A standard size for this cake. If you don’t have one, any similar-sized dish will work.
- Spatula: Perfect for spreading toppings. A butter knife can also do the trick.
- Plastic wrap: To cover the dish while freezing. Aluminum foil is a good alternative.
Variations
- Fruit Layer: Add a layer of fresh fruit like strawberries or bananas for a refreshing twist.
- Nut-Free Option: Skip the nuts and use crushed pretzels for a salty crunch instead.
- Vegan Version: Use dairy-free ice cream sandwiches and whipped topping for a plant-based treat.
- Chocolate Lovers: Swap out the whipped topping for chocolate whipped cream and use chocolate syrup for an extra chocolatey experience.
- Seasonal Flavors: Try pumpkin spice ice cream sandwiches in the fall or peppermint in the winter for a festive touch.
Serving Suggestions
- Pair with Fresh Fruit: Serve slices alongside fresh berries or sliced bananas for a refreshing contrast.
- Ice Cream Scoops: Add a scoop of your favorite ice cream on the side for an extra indulgent treat.
- Presentation: Garnish each slice with a drizzle of chocolate syrup and a sprinkle of nuts for a beautiful finish.
- Drink Pairing: Enjoy with iced coffee or a cold glass of lemonade to balance the sweetness.

FAQs about Ice Cream Sandwich Cake
Got questions about this delightful Ice Cream Sandwich Cake? You’re not alone! Here are some common queries that might pop up as you whip up this no-bake treat.
Can I make this Ice Cream Sandwich Cake in advance?
Absolutely! This cake can be made a day ahead. Just keep it covered in the freezer until you’re ready to serve. It’s a great time-saver for busy days!
What if I don’t have ice cream sandwiches?
No worries! You can use any frozen dessert bars or even homemade ice cream layers. Just ensure they’re firm enough to hold the structure.
How long can I store leftovers?
Leftovers can be kept in the freezer for up to a week. Just make sure to cover it well to prevent freezer burn. But trust me, it’s so good, you might not have any left!
Can I customize the flavors?
Definitely! Feel free to mix and match flavors of ice cream sandwiches and toppings. The beauty of this cake is its versatility!
Is this dessert suitable for kids?
Yes! This Ice Cream Sandwich Cake is a hit with kids and adults alike. Just watch out for any nut allergies if you’re adding those crunchy toppings!
Final Thoughts
Creating this Ice Cream Sandwich Cake is more than just whipping up a dessert; it’s about making memories. Each layer tells a story, from the first scoop of ice cream sandwiches to the final sprinkle of joy on top. It’s a treat that brings smiles, laughter, and a sense of togetherness, perfect for those warm summer nights. Whether you’re serving it at a family gathering or enjoying a quiet evening at home, this cake is sure to delight. So grab your ingredients, gather your loved ones, and dive into this delicious adventure together!
Ice Cream Sandwich Cake: A Delightful Summer Treat!
Ingredients
Method
- Line a 9x13 inch baking dish with a layer of ice cream sandwiches.
- Spread half of the whipped topping over the ice cream sandwiches.
- Drizzle half of the chocolate syrup over the whipped topping.
- Sprinkle half of the crushed cookies and nuts over the chocolate syrup.
- Repeat the layers with the remaining ingredients.
- Top with sprinkles if desired.
- Cover and freeze for at least 4 hours before serving.
Nutrition
Notes
- For a different flavor, use different types of ice cream sandwiches.
- Can be made a day in advance for convenience.
- Let the cake sit at room temperature for a few minutes before cutting for easier serving.